The older I get, the more I love the Glute Ham Raise.
The Glute Ham Raise (or GHR) is a simple, but challenging exercise that works the entire posterior chain – the oft neglected back side of your lower-body. The posterior chain includes the calves, the hamstrings, and the glutes. There’s many exercises that you can use on this critical area – but I think the GHR has benefits above and beyond the rest.
Why do I love this exercise so much?
Read on to find out more.
Why Strong Hamstrings and Glutes Are Important
First of all, let’s agree that hamstring and glute strength and endurance are important.
The hamstrings are extremely important muscles that help with explosive movement, agility, and speed. They are particularly important for cyclists, sprinters, runners, swimmers, and a wide variety of other athletes. But all these benefits apply to regular life as well – not just athletes. Strong hamstrings help with injury prevention as they take pressure away from the delicate knee joint. The hamstrings also help to stabilize the hips and keep your spine in correct alignment so your posture remains correct.
The glutes (gluteus maximus and gluteus minimus) are one of the largest muscle groups in your body. Strong glutes provide power and strength for walking, running, jumping, cycling, and weightlifting. Like the hamstrings, they also help to keep the spine in alignment and assist with injury prevention.
Want to have good posture and keep your knees healthy? Then you need strong glutes and hamstrings.
FitAtMidlife catches up with Brian Schwab – a seasoned powerlifting competitor with over 35 world records to his name, over a 20 year time span. Brian knows a thing or two about strength and lifting for longevity, and here’s what he had to say about the Glute Ham Raise:
“One of the most common mistakes I see in younger lifters is their neglect of accessory work. Powerlifting has often been referred to as a marathon, not a sprint. In order to have longevity and prevent injury while consistently getting stronger lifters need to do whatever they can to prevent having weaknesses. Glute ham raises incorporate both knee flexion and hip extension simultaneously, exactly as they’re used during squats and deadlifts. The glute ham raise is essential for long term success in these lifts.”
Brian is proprietor of Orlando Barbell.
How To Do the Glute Ham Raise (GHR)
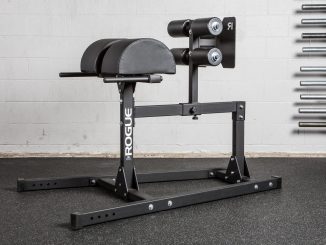
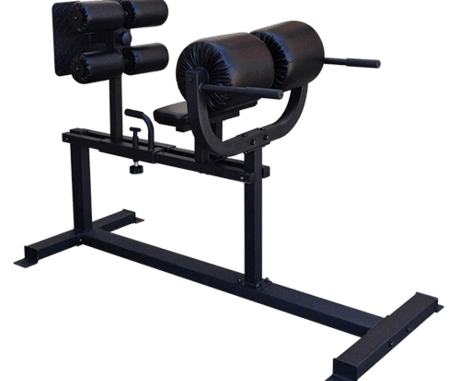
The basic Glute Ham Raise (GHR) is a bodyweight movement that concentrates on knee flexion and hip extension and utilizes the hamstrings, glutes, calves, and lower back. How do you do a Glute Ham Raise? The best way is with a Glute Ham Developer (GHD) device (also commonly called a Glute Ham Bench):
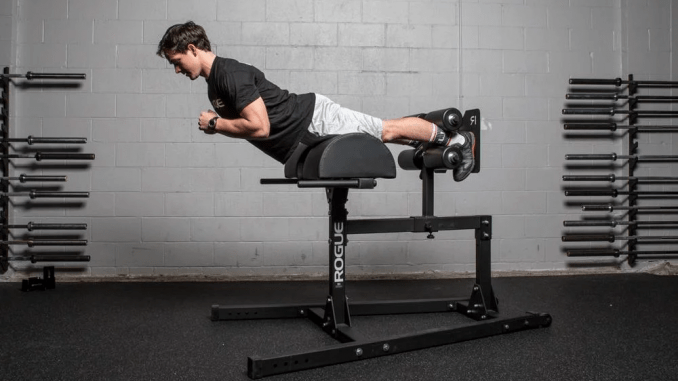
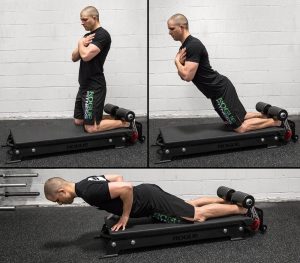
- To start, place your ankles between the ankle (or foot) roller pads with your feet flat on the vertical foot plate.
- Position your mid-thigh against the thigh pad.
- The movement can be made easier, or harder, according to where you place your hands. For a beginner, keep your hands lower on your body.
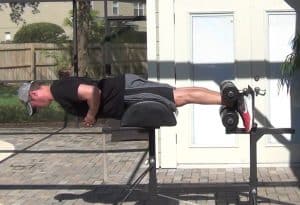
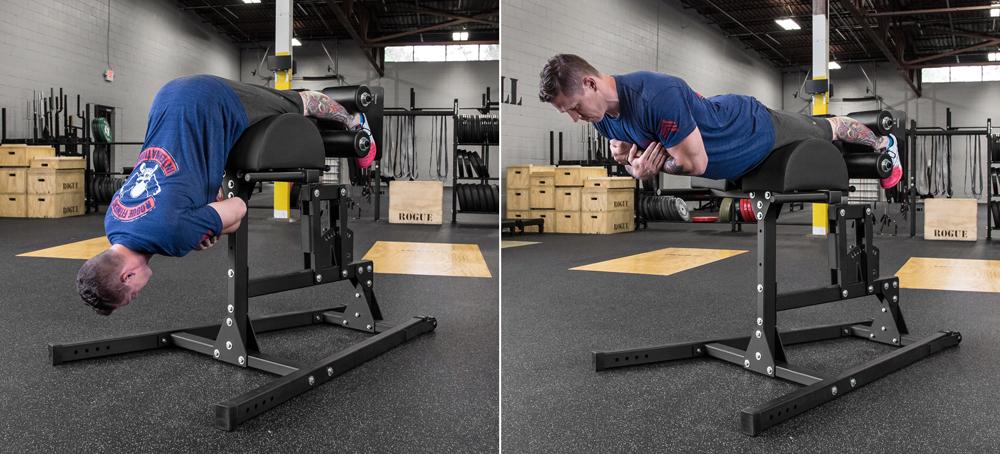
- Bend forward at the hips, and lower your torso as much as you can without flexing the lower back.
- Begin the movement from the lower position by extending your hips until you are horizontal. This is a “hip extension”.
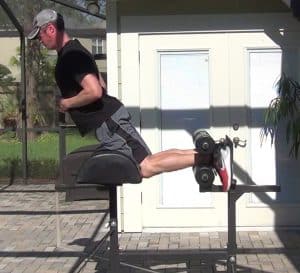
- Continue to raise your torso upright by flexing your knees until your body is upright. Keep your feet as flat as possible on the vertical plate for the entire movement. This is about 1/2 way through knee flexion.
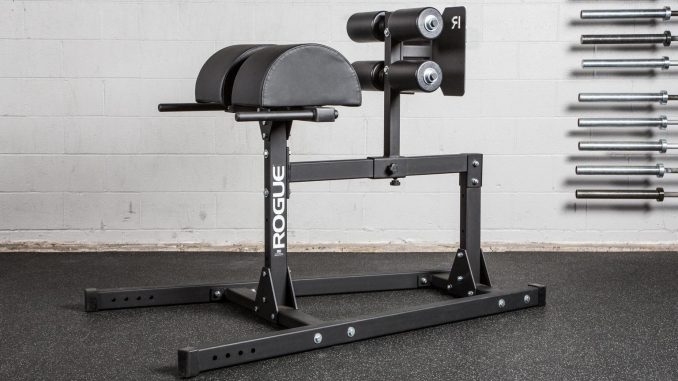
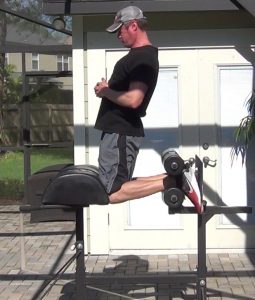
- The final upright position looks like this
- Return to the starting position by first straightening your knees, and then bending at the hips. One repetition is now complete.
Secondly, to make the movement easier you can bend slightly at the hips as you move your torso upright. This makes the movement easier – but it is not proper form – so only use this method as you work your way to being able to perform a full, proper rep.
What does it look like? Here’s a video
Benefits of the Glute Ham Raise
The GHR is an awesome lower body exercise – primarily because of the sheer amount of muscle mass worked. Let’s look at the muscles worked intensely by the GHR:
- Hamstrings – The main target of the movement, all 4 parts of the hamstring are worked intensely- the biceps femoris long and short head, the semitendinosus, and the semimembranosus.
- Glutes – The gluteus maximus – aka the butt or hips also get a lot of work during the raising of the torso from the completely lowered position.
- Erector spinae – The spinal erectors (lower back) are also worked in a static, isometric fashion throughout the move. The GHR is a safe way to work these muscles hard with little risk.
- Calves – Surprisingly, this is also a pretty intense calf workout! The gastrocnemius is worked intensively through the all parts of the movement – in an isometric fashion.
Not only does this exercise work a ton of muscle, but it does so in a low-impact, joint friendly fashion. Let’s explain.
Let’s start with the lower back. When done properly your lower back is kept in a “neutral” (without hyperextension or hyperflexion) position and worked isometrically throughout the movement. This let’s you build lower back strength and endurance without putting lumbar discs at risk.
Secondly, this is one of the few ways to intensively workout the hamstrings without putting a lot of compressive force on the spine. Why? Because it’s primarily a body-weight exercise, you’ve got nothing loaded on your back (or in your hands) that’s going to create the compressive force. This exercises uses the torque arm effect of gravity on your upper body to provide the resistance.
It’s also both knee and hip friendly. As people age, their hips and knees tend to degrade – both are moving joints, with cartilage that wears away over time – and doesn’t replenish itself quickly. This move is very knee friendly. You may have pain with squats or deadlifts, but probably will not with the GHR. Why not? Take a look at where the knees remain relative to the feet throughout the movement – they are not far “out” over the feet – ever. This is the same principle that makes a “box squat” so much more knee friendly than any other type of squat. Also, unlike the leg extension, which is a lot of knee pain for many people, all the stress is on the backside of the leg (The hamstring attachments are on the backside of the leg- obviously) – so the kneecap isn’t getting rammed into the cartilage of the knee joint capsule. This further keeps the knee joint healthy and pain-free.
What about the hips? There is hip flexion and extension involved, but without the heavy loading of weights like in a squat or deadlift, there’s really not a lot of adverse stress on the joints.
So, to sum it all up, the GHR lets us place a lot of volume or intensity (or both) on a lot of lower-body muscle – in a joint friendly fashion.
You can build strength, endurance, and muscular hypertrophy with this joint friendly move. It’s the perfect leg exercise for older trainees, but it works for younger trainees as well, for all the same reasons. And for those reasons, the older I get, the more I use it and rely on it.
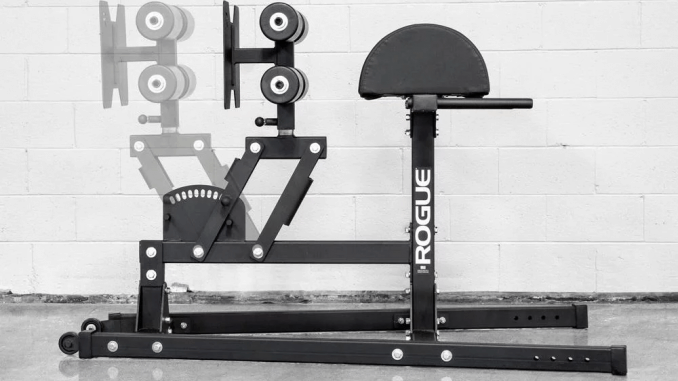
What is a Glute Ham Developer (GHD) or Glute Ham Bench?
Okay, so now you’re convinced of the benefits of this great exercise. But the biggest drawback is that to do these right and with convenience and efficiency you really need a Glute Ham Developer (GHD) also commonly called a Glute Ham Bench. These are a rare find in most mainstream gyms, and there’s many models available online, but it is a relatively pricey piece of equipment with good models starting around $400.
Still, I think it is one of the best home gym or garage gym investments you can make.
First of all, it is hands down the best way to do the GHR.
There’s other equipment and cheaper options that will let you do partial range of motion GHR. But partial range of motion means less muscle worked – and this move is great because of the amount of muscle worked. So a partial range of motion GHR is not the best option.
There are alternatives. There are specially designed pads that let you do a very limited range of motion GHR – as long as you have a workout partner to hold your ankles in place. There’s also DIY or home made methods that require other equipment to happen, but quite frankly that gets old quick. It’s inconvenient to find someone to help and more importantly most of these methods don’t allow for the full range of motion, nor do they let you do the GHD Situp, Russian twist, or the hip extension.
If you are serious about benefiting from the GHR, you’ve got to find a Glute Ham Developer you can use. If you’ve got access to a serious athletic training facility such as a university gym you’ll probably find one. Secondly the GHD is a popular piece of equipment for both powerlifters and CrossFit. If you’ve got a CrossFit box nearby – they may have one. Or try your local hard-core, black iron powerlifting gym. The GHR is a popular “accessory” or secondary exercise used to strengthen the hamstrings for both the squat and deadlift.
If all else fails, maybe you just need to break down and invest in one.
This isn’t as bad as it seems. Not only is the GHD the best way to do the GHR, you can also do these useful exercises:
- Hip or glute focus variations of the GHR – You can selectively limit the range of motion of the GHR to work more intensely the hamstrings or the hips/glutes. Half range of motion from the lowered position to torso horizontal is known as the hip extension. This will up the intensity for the hips, glutes, and lower back, as it eliminates the brief respite these areas get when you continue on to being fully upright.
- Similarly, you can increase the intensity on the hamstrings by not lowering your torso beyond horizontal. The hamstrings get a brief rest when the movement turns more hip-centric – and if you eliminate that – your hamstrings will be on fire, sooner. If you are looking for hamstring hypertrophy – this is your move, because it bumps up the “time under tension” and that is a hypertrophy prerequisite.
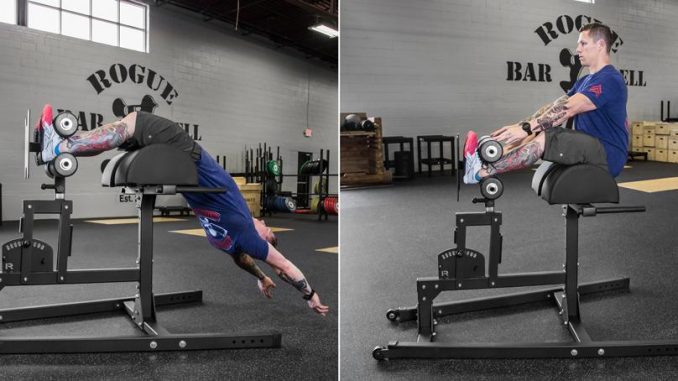
- GHD Situps – Popular in CrossFit, the GHD situp is considered the ultimate abdominal or core movement. This wicked movement puts the abs through a huge range of motion, with intensity and speed. It also facilitates training the hip flexors, which are meant to work in collaboration with the abdominal muscles. A strong core gives you stronger midline stabilization, which affects all athletic movements as well as movements in daily life. If you do these – start conservative – this one is going to make you SORE the next day. So don’t go overboard. But conversely, don’t we want the most intense, efficient exercise possible? Yes, we do. GHD Situps really can’t be done without a GHD.
- The GHD is the ideal equipment to allow you to do Russian Twists. Lock your feet into the foot pads, facing up, and twist left to right whilst holding a weight plate at arms length.
- Reverse Hyperextension – You can do a poor man’s version of the reverse hyperextension (lower back movement – popularized by Louie Simmons and Westside Barbell) by being “backwards” on the bench. Hang your legs out over the hip pad area and grasp the vertical foot plate with your hands. Use bodyweight, ankle weights, or hold a dumbbell between your legs for resistance. You can also use bands – if your GHD has band pegs. You won’t be able to load up as much weight as on a proper hyperextension machine, but quite frankly, I don’t recommend you work the lower back with tons of weight. Stick to light to moderate weights and repetitions instead.
When you look at what you can do with a GHD, and the benefits you can derive – it makes a lot of sense to invest in one. There are a variety of models that vary in features, foot print (floor size), and stability. You may even be able to find one used for sale. But these things never last long on craigslist, they go quick.
I own one, and it’s one of the best training investments I ever made for my garage gym. But maybe you aren’t in the position to buy one, or don’t have the space for one, or aren’t quite convinced yet. How else can you dabble in the GHR? We’ll talk about that next.
How To Glute Ham Raise Without a Machine
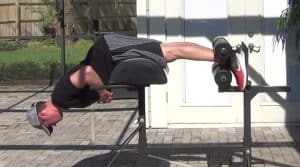
If you search the internet, there’s a variety of alternative methods you can use to do a partial range of motion GHR. Here’s a few examples.
The Natural Glute Ham Raise involves using the leg pad of a preacher bench or lat pulldown machine to approximate a proper GHD. You’ll be on the equipment backwards, and using the seat as a lower-leg or thigh pad. There’s two problems with this – #1) it’s pretty unstable, #2) You aren’t going to be able to get the full range of motion and #3) the seat is not going to support the thighs, in most cases. It’ll work, somewhat, but not ideal.
Secondly, these can be done from the floor, as long as you have a place to anchor your feet and a thick pad for your lower legs. Search YouTube for “glute ham raise at home” and you’ll find many ideas – ranging from the practical to the near ridiculous (you’ll also see some interesting DIY contraptions made from 2x4s). Again, the problem with these methods is you can’t get the full range of motion and you can’t really support the thighs proper so it’s gonna be harder on your knees.
In summary, you can dabble with a partial range of motion GHR using some DIY or expedient methods – but I wouldn’t attempt to make it a long term training option. It’s too inconvenient and it’s not the best way to do the move. You also can’t benefit from the GHD situp.
Glute Ham Raise Progression
Real training (as opposed to exercise solely to burn calories) requires progression. We’ve got to be getting better – more weight, more reps, faster, etc.
Method #1 to progress is to do more reps. Start with 1 rep with proper form, then 2, then 3, and so on. Do not underestimate the power of small increments in progress! Adding 1 rep per workout (or week) is still great progress.
You can also do them faster, but at some point inertia, momentum, and “stretch reflex” are giving you an unfair advantage. I don’t recommend the GHR be done as a power (maximum force in minimum time) move necessarily, but you can do them faster. Just be reasonable.
Regarding weight – earlier we said the GHR is a bodyweight movement – and that’s true, there are a number of ways you can progress the movement using nothing more than your bodyweight.
As we eluded to earlier, the position of your hands and arms makes a huge difference in the difficulty of the exercise.
So the first way to progress the intensity and difficulty of the exercise is to alter where you keep your hands and arms.
Keep your hands and arms low on your body to start. Once you can do 5 or more proper reps, try keeping your hands at chest level. Once you’ve mastered that, hands at head level (or behind the head and neck – just don’t pull on your neck this puts undue stress on your cervical vertebra and discs – another item that doesn’t age well). Lastly raise your arms over your head. The arms over head variation is significantly more challenging than keeping the hands low. So, you can progress quite a long way with nothing more than bodyweight.
Once you’ve mastered hands over head – you probably need to move on to weight plates. You can hold a dubmbell or a standard or olympic weight plate to your chest while performing the move. The biggest drawback to weight plates is that your grip may tire before your lower body does. It’s also difficult to get into position when using 45 lbs or more.
Another option is a weighted vest. These are a somewhat expensive option (compared to holding a weight plate) but a weight vest is another versatile investment you can use for many things (rucking, pullups, air squats, etc.) I don’t recommend a loaded backpack, because the weights slide too much in the lowered position. Any weighted vest that secures the weights with minimal movement is going to work – just remember you’ll be near inverted in the start position – so you don’t want weights sliding around.
Bands are also a possibility – assuming your GHD has band pegs. These are a great way to add difficulty and you can go quite far with bands. As an added bonus it’s not difficult to get into the start position, and your grip doesn’t tire out.
Lastly, there’s other methods to make things more challenging. You can slow down the eccentric – lowering yourself extra slow – this really bumps up the intensity (and will make you very sore the next day). Or you can pause at the horizontal position – this removes any inertia, removes any “stretch reflex” benefit you’d get otherwise and is somewhat akin to a “pause” squat – which is much tougher than a normal squat.
You can also perform isometric holds – Hold yourself about 2/3rds of the way through the upright position – for time.
And finally you can do these one leg at a time. It’s a little difficult but alternate between using your left leg and right leg to do the primary work. You can keep both feet in place on the foot plate, but make the primary leg do most of the work.
Given the amount of muscle mass involved – I like to keep the reps on the high side – meaning 8, 10, 12, 15, or more. With time, you can even do sets of 25, or 30. Admittedly, a set of 30 isn’t easy and will involve some strategic “rest” at the top of the movement. How do you get there? Well, start with 10, then do 11, then 12, and so on until you can do 30. I say as long as you don’t dismount the bench you can count it as an unbroken set.
This isn’t a move you should be doing for 1 Rep Max (1RM) “singles”. That’s not really the point.
But overall, with all these options you can take your GHR quite far, developing both strength and endurance, without joint pain.
In Summary
Fit At Midlife Bottom Line:
- The Glute Ham Raise (GHR) is a great lower-body, posterior chain exercise that works a lot of muscle mass with intensity and volume.
- The hamstrings, glutes, calves, and lower back are all worked intensely. These are all areas that are often neglected by trainees.
- The GHR is hip, knee, and lower back friendly – without compressive spine forces and through static contraction of key muscles. It’s great for older trainees who need a hip and knee friendly leg workout.
- The Glute Ham Developer (GHD) device is somewhat hard to find in public gyms, but makes an excellent addition to a home or garage gym. It allows the GHR movement to be performed properly, as well as the GHD situp, and a poor man’s version of the reverse hyperextension.
Photo Credits
- Some product imagery on this page is property of Rogue Fitness and provided by Rogue Fitness.
- Some product imagery on this page is property of FringeSport and provided by FringeSport.

Tim is the founder of FitAtMidlife.com – an avid gym rat for 30+ years, he’s a reviewer of many, many shoes – and founder of the Speed Bag Gathering – the world’s only gathering of speed bag punching enthusiasts. See more gym reviews at Tim’s YouTube channel.